pink

Monday, March 21, 2011

Daily challenge - Day 23

Saturday's project was room beautification! I picked up an old frame, painted it up and sealed with an acrylic sealer. Next I picked my words of creative inspiration and fine tuned in CDS and MTC. "Wish it" is Cursive 101; "dream it" Opposites Attract" and "create it" is Brush Script STD, a ttf from my computer (and the one done in MTC). All phrases are welded together and in the case of "dream it" I had to shorten the length. Each one is about 4 inches in height; 12x24 inch mat required for this one. Then on the left is a bird from the Straight From The Heart Cricut cart. I really wanted the artsy look on this one and even DH was impressed!

All of this is above my custom made scrap table. We have 3 more things to do to my room before I'm ready to show it off in a video tour - each of them weekend projects. Don't worry! We're almost there! I spent all weekend organizing my space in our huge walk in attic - which is adjacent to my scraproom and finding a home for everything. As a result, the guest room is finally cleared out, lol!

One more thing about this project, I used the HL Paper Studios vinyl. Bad mistake! It doesn't stick very well and yes, my wall is clean. So I'll have to pay for the PC vinyl unless my local sign maker has some black vinyl scraps. 


Enjoy!:


Daily challenge - Day 22

ok! trying to get back on track here! I have many things to put the finishing touches on. Here is one: a giant paper flower! All it needs is a giant paper pin wheel. It can be used to decorate your child's room or play room. I'll even give DH credit for thinking of putting it in the yard on a clear day for party fun. What a great way to use paper you no longer want!

I painted a 7/8 inch dowel stick green, actually Bright Green (FolkArt, Acrylic Paint). Then I took a piece of 12x12 card stock about the same color, folded it in half, and cut out two hearts each one of varying lengths. Make sure the crease is there really good, this serves a purpose later. Choose your embossing folder or plate. I used one by Sizzix and ran it through my Big Kick. The crease from earlier should still be there and serves as the crease found down the center of many types of leaves.


As far as the "flower" itself, the first layer is 5 pieces of printed paper cut at 6x12 inches. I used EK Success punch "Circles". The next layer was 5 (I think, maybe 4.5)x12 inches; I think I used 3 sheets. The punch is Martha Stewart Doily Lace. The 3rd layer EK Success, Scallop Daisy. I think that was 2 sheets at 2 1/2x12. 4th and 5th layer was a Spellbinders Grande die with This to That pop dots by American Crafts; if you don't have the Spellbinders Grande dies (they ARE expensive), maybe there is something similar in your SVG files or Cricut carts with a scalloped edge. Top "layer" is a Prima Floral flower of my choice. Make sure you glue (glue gun preferred) large cut out circles between layers, bottom and top, for stability.

Using a glue gun adhere the leaves to the dowel and the dowel to the back of the flower. If you're going to use for decoration I recommend styrofoam in the flower pot. The photo shows the flower up against the door next to the door knob so you can see it's height and perspective.

Enjoy!:

Thursday, March 17, 2011

Daily challenge - Day 21

Here is a really cute layout that allows you plenty of space for both photos and journaling. The photos are on pockets I made and the tags are sticking out from behind. This is paper I had laying around; sorry! I do not have it in the store. But i did use core'dinations for the pocket. It was already embossed; all I had to go was sand it. The phrases on there are relevant to beaches, vacation and leisure time.

Enjoy!:


Wednesday, March 16, 2011

Daily challenge - Day 20

Hi everyone! I'm proud to announce that I managed to cut out my first MTC images. Key West is one of my favorite places to visit. So I really wanted to have some images for that. I have the Rt 1 sign, A1A sign, Mile Marker 0 (on Whitehead St) sign, and the sign to keep left.  I'll attack the KW flag and the Southernmost buoy next ;-).  Yeah, those two will be a really involved project; I hope I can do it.

For those of you who have never been to Key West, or driven there, the sign to "keep left" is the first sign you see at mile marker 5 when you get to the island; you have a choice at that point to go to the airport, or head for Old Key West. After spending potentially hours driving from Miami or even Ft. Lauderdale (2 lanes most of the way and much of it at 35 mph - and you can't drive it straight through with so much to see along the way), that sign is a relief! 

I have TONS of pics from our travels there; it's now gotten to the point that DH wants to go somewhere else (I don't) this year. There's one shop that recognizes me on the spot and even "yelled" at me to stop taking Key West home with me, to just move there (that's because I spend a lot of money at his store). OMG! a majority of my kitchen is decorated with stuff I bought in KW! 

I love Halloween in KW. One year we went dressed as Marge and Homer Simpson and people could not stop taking our photo! I cannot post the photos because 1. DH would shoot me; and 2. some people may find it offensive because DH wore whitey tighties (2 pairs in an effort to hide his junk) and he's over weight. If you watch the show sometimes Homer is seen sitting on the couch in his underwear. The temperature in KW is normally warm that time of year so I knew we would get away with the attire. Yes, we were covered in yellow body paint (which was very difficult to wash off) and I made a giant doughnut for DH. We also picked up a fake Duff beer can at Universal in Orlando. DH also wore a bald cap and I drew (with a sharpie) Homer's hair line on it. What's sad is, DH did look kind of like Homer after I was through with him!


Anyway, enjoy the pics of my first MTC project: 


Tuesday, March 15, 2011

Daily layout challenge - Day 19

Ok! Day 19 (yesterday)! How about a project? Will you let me count that?

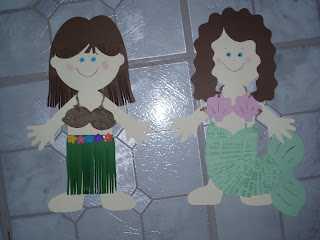
Below are pics of some paper dolls which required my E and the Martha Stewart fringe scissors that came out last year. Believe me, my hand was sore afterwards but look at how using the scissors added texture and dimension to these projects!


On the hula girl I used jute string cut up very finely for the coconut bra. Add a little glue, like Aleene's Fast Grab and sprinkle your cut up jute string over it. Looks pretty natural, doesn't it? The flowers around her waist are stickers.

The Flapper Girl is not an image on the Cricut carts; that's something I made up using a dress on the EPDP cart; I had to cut it out a little larger than the image itself, then cut off the sleeves and trimmed the side so it was as straight as possible. The hat I had to improvise as well; I cut 3 one inch strips of paper and angled it as shown; then trim around the head. The bow was from the Disney cart on one of the Minnie Mouse images; cut it out twice; once for the back without the slits in the bow, 2nd time with the slits. I found a red boa in my closet and pulled out a feather for the bow on the doll and added a red rhinestone in the center of the bow. Such cuteness!

As you can see, this project required a LOT of cutting and layering. You will also need a lot of glue dots to keep the fringe from flipping up. On the Indian girl the top row as a larger margin so I could fold it over from behind and cover up the edge. I did the same thing on the Mermaid and Flapper Girl:


Don't forget I'm having another challenge here on my blog! You must be a follower to participate. Click here for details!

Daily layout challenge - Day 18

Hey alright! I'm getting caught up! Here's the layout that was supposed to be for Sunday March 13. I wanted to do something for the youngest member of our family with the Prima Marketing paper line Jack and Jill. It is the cutest paper I've seen for children. Very soft features. However, I also wanted to so something comical. Not sure I like how it came out but hopefully the point is taken that the baby in the family is still a baby, and that fully grown dogs in the family are NOT babies (though they like to think they are).

Ironically, I decided to use the cart "All Mixed Up" for the second part of the phrase as sort of a symbolism that the dogs are mixed up as far as thinking they are still babies. HA! Special attention to the extra large dog in my SIL's lap and DH's dog in my dog's bed; she's a Brittany, my dogs are under 10 pounds each, yet for whatever reason the Brittany thinks she can fit inside their bed. Usually she can't without her feet hanging over the edge, or spread out across both their beds, or curled up but pushing the sides out on the bed. Sigh...

Oh, the Jack and Jill collection also has matching 4x6 note cards, flowers, baubles (for embellishments), and sticky canvas tags (canvas laminates), each sold separately. As you can see in the photo I used the baubles as the center of the flowers. There is a square on the border of each paper that tells you which colors (cardstock, ribbon, etc.) best matches the line. Enjoy!:


Don't forget I'm having another challenge here on my blog! You must be a follower to participate. Click here for details!

I'm behind on layouts

I know I know. I had a very busy Sunday. Then it was my turn to be at the store on Monday. Guess what I'm doing today? I may even not only get caught up, but a day or two ahead (with any luck at all). Stay tuned......

Freda

Saturday, March 12, 2011

daily layout - Day 17

oooh! Delicious cupcakes. GLORIOUS cupcakes! I know I've used some of these photos before but that was for a demo for a class or for my store. This layout, well DSD (that's darling step-daughter, don't know if there's such an acronym) will probably inherit it - some day. Anyway, I found some great cupcake paper at HL a couple of weeks ago when specialty paper was on sale for 50% off and I could not resist! And I'll tell ya' another thing! it was a lot easier than cutting up and decorating that many cupcakes on my E!

I think I mentioned in another link on my blog that I made the cupcakes in a sugar cone inserted in a special pan that keeps the cones from toppling over in the oven. It was really simple to do; simply fill the cones about 1/2 way and no more than that. The cake mix will rise. You don't want too much in there otherwise it will overflow (trust me on this one).

Some of the kids licked the icing off the top and tossed the rest into the garbage. How funny! Some even argued over which color icing they were going to get. We got tired of that real quick and told them 'you get what you get'! One tray was chocolate, the other yellow. If you have the time, make your own frosting; it will stand up better than anything from the store, even the Wilton's brand.

Anyway, I wanted to do some kind of layout that would allow me to show off as many pics as possible from this party. The E cart I used was Cuttin' Up which is one of my favorite carts to use when I need a good font to cut out that will be thick and not tear up on me when I cut small. This one was cut at 1.5 inches. The pink polka dot paper on the letters is BoBunny double dot Tutu:

Friday, March 11, 2011

Daily layout challenge - Day 16

Woo HOO! not too late tonight now is it? Ok, I'm at the store tonight with some ladies for crop night and below is tonight's make and take with the coordinating page. Also, a close up of the written sentiments on the layout. The paper line is Echo Park Life is Good.

Now, for the contest, and you MUST be following my blog, the first 10 people to tell me which Cricut Carts were used in the layout, and which Martha Stewart punch I used, will go into a drawing to get one of the following carts (your choice): Summer in Paris, Independence Day, Pumpkin Carving, October 31st, H20, Thanksgiving, Christmas Village, or Christmas Cards.

I have photos for the layout but forgot them :-(


Daily layout challenge - Day 15

Yup! Another late night one. Sorry about that. It's been a busy day and tomorrow won't be any better. Let's hope by the weekend I'll be caught up. It's very difficult to juggle all this with usual responsibility, customer requests, and still be able to put in some me time. Will add pics later. This layout is using Echo Park's Be Mine. The ribbon is from HL. Wish I thought to make the ribbon continuous; probably would have thought to if I weren't so tired. But it's stuck there until I feel like dragging out the Un-du; tried to lift it up and reposition but it tore the paper on the back of the printed paper. Love the tickets and journaling tags! Enjoy!


Thursday, March 10, 2011

Daily layout challenge - Day 14

Sorry this is coming in so late! It's been a loooooooooooong day!

I love this layout! I wanted so bad to do a layout with my fur babies. I'll do another if I can find this really cute photo of my Maltese of eating from her bed (the little prima donna didn't want to leave the comfort of her bed). Actually, I'll do another regardless if I find that photo.

I messed up a little on the photo layout with the Maltese; did better on the layout with the Shih Tzu. I was inspired by the icon on my desktop to one of my photo editing programs. Oh funny is that?

Enjoy!


Tuesday, March 8, 2011

Daily layout challenge - day 13

Ugh! #13. Ok...here is today's layout. It's quite simple. But I'll try to do something a bit more elaborate for tomorrow. With this one I took some old scraps of paper I had and cut them into quilting triangles. Then I pieced them together. Double matted. Crimped and inked hearts. Martha Stewart punch. And some ribbon. Nothing really special. So for a crop night this would be a very quick, easy, and cheap layout to do:

Monday, March 7, 2011

Daily layout challenge - day 12

yup! it's another sign. Sorry about that. At the store, costumer sometimes do not realize I have a second room - which is next to my original room. They come in, go to the back of the store, see all the scrapbooking stuff, and stop there. They don't bother poking their head in the room next to mine to see that there is more scrapbooking stuff in there (ahem, cardstock, ribbon and prima flowers specifically). So I made a sign using Cuttin' Up and my new Cricut Circle cartridge Cricut Everyday:


Here is how the sign looks hanging up in my store:

Sunday, March 6, 2011

Why is my DH's head in the toilet?

While I was working on a project I walked up to DH with a hole punch in my hand (upside down) to ask him something. He started laughing and said my punch looked like a mini-toilet bowl. Comments?

Daily layout challenge - day 11

Well, this isn't exactly a layout although it has the makings for one. Nope! It's another sign. This one for a friend who is involved with Bingo in her neighborhood. She said she just wanted a sign that says bingo, but when you knowingly ask a scrapbooker to make a sign you just may get something like this:


As some of you can tell I used my Tim Holtz A2 folder for this one. Plus, I distressed the edges of the bingo cards with my Zutter Distrezz-it-All. Apply a little ink, punch out a few markers and adhere and it looks great! Where the markers are is where I adhered them. We've all played bingo and you know how the markers are often scattered around your work area and how we play with multiple cards.

I'm not quite done yet. Going to run off a strip of raffle tickets and stamp them.

Saturday, March 5, 2011

Blog candy #2: and the winner is...

Drum roll please!

Melissa - hooked on Disney - is the winner! You were #14 out of 18 entries. Please contact me so I know where to send your cart of choice - and which cart you want since you were being indecisive ;-).

Thank you all for playing. I will do it again real soon, like when I hit 150 followers. I have plenty of new, unopened Cricut carts to give away as well as glue dots, stickers, stickles, and all kinds of stuff. You will be please. So tell your friends to follow me and start a blog if you don't have one already.

Daily layout challenge - day 10

Here is a Halloween layout for you Halloween lovers! I did some of this in CDS (Trick or Treat, Smell my feet!). But what might grab your attention is the blood line. That is a very SIMPLE technique using glossy accents and some Tim Holtz alcohol ink (Cranberry).

Get out a piece of wax paper, about 13 or 14 inches in length. Next, draw on the wax paper with your glossy accents a line. As you go along, dip down to create that drippy goo look (yes, blatant rip off of words from a MS punch). Use a ruler to draw a straight line, or draw the liquid as close to the edge as possible if you need help drawing a straight line. Allow to dry over night. Now, you can also use this as icicles. But if you want blood, squirt a few drops of alcohol ink on the felt pad of your blending tool and ink away! It will dry after a few seconds. Apply a second coat if necessary. Easy peasy!


Cartridges used: Cuttin' Up, Paper Doll Dress Up, October 31, and Halloween.


To get the look I did with the phrase open up your copy of CDS and click on Cuttin' Up. Let's first do the shadow part. Set your mat to 12x24. No, we're not really using a 12x24 size mat, just want CDS to think that so everything will fit on one 12 inch line without stopping after 9 inches and continuing on the next line on the mat. Anyway, click out your phrase in the shadow feature of the cart. On the next line (I would go down an inch or two), be in regular mode (not shadow) and click out the phrase again. Now, temporarily move your bottom phrase over your top phrase and determine where you need to nudge each letter over a bit - if necessary - so that the regular sized letters fit over the shadow letters. The regular letters, when cut out, will be your highlight so you won't have to ink letter edges (black in the photo). The shadow letters will be the top layer (orange in the photo) You do not need to weld anything.

When you're finished lining up everything move one row of letters a few inches below the other. When you cut, make sure you use two different colors of cardstock. You cannot do this without CDS because you will need to nudge letters over. Be sure to set your mat size back to 12x12 (unless you are cutting out on a 12x24 mat) so your cricut will cut.

Now the green under the phrase, that's pigment ink sponged on white cardstock. Doesn't it look glowing?

The bats and clouds are from a Quickutz die.

I cut the tree and house out at 9 or 10 inches I believe. They are very intricate and require a large cut in order for it to come out looking good.

Sorry about the pumpkins! I really wanted the ones from Happy Hauntings but could not find that cart when I was doing the layout. Sigh...something else for me to change later. (yes, I found the cart)


Today is the last day!

Today is the last day to try for the cricut cartridge give away I'm having. Click here for the details and to go to that post. Thanks all! :-)

Friday, March 4, 2011

Daily layout challenge - day 9

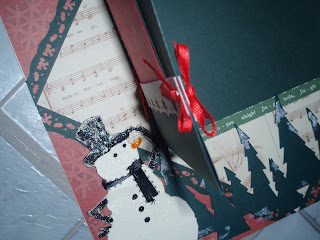
How about a Christmas layout? This one was a lot of fun! There are pockets and folders which means lots of places for photos. Don't let the appearance fool ya'!

I don't remember what paper I used; I think it was a combination of American Crafts and Adornit.


As you can see the front part opens up so you can put more photos on it; that's where the tags come in. Put a photo on one side and journal on the other side (the white/ivory side). I created a pocket by folding a piece of cardstock in half and then placing under the paper where it's going. Hole punch on each side and used ribbon looped through another piece of ribbon to keep in place. Voila! the center of the tri-fold is for the main photos, perhaps a group photo or the favorite pic of the bunch.


On the coordinating page there are a bunch of diamonds where I can add small photos and embellies. Like I said, great layout for tons of photos. Afterall, when it comes to Christmas photos how can you pick only one or two photos?


On the snow man and snowflakes I used Tim Holtz's BIGZ die and Rock Candy to get the tiny cracks. I adhered cardstock to a cereal box and then cut out on the dies. I also used stickles to color in the snowman. The tree line is a12 inch Quickutz cookie cutter; I cut out a total of three 12 inch strips. The 3rd on was to cut up and use for a dimensional effect with pop dots.

The punches are MS and EK.

Enjoy!


Thursday, March 3, 2011

Daily layout challenge - day 8

Hi everyone! Yes, I know it's well past Christmas but I just had to show this layout. It's an 8x8, perfect for scrapbooking cookie swaps, and if any of you like to plan ahead, or do Christmas in July, then you might appreciate this.

Like I said, this is an 8x8. If you're doing a cookie swap then the idea is to put together a kit for each of the ladies in your cookie party; they will have to put the page together for themselves while everybody eats the cookies they all bought. So if 10 ladies go, then each one will have ten 8x8 recipe layouts to put together at the gathering!And you will have 9 new recipes! You can put all of these together in an 8x8 album for your recipe card collection.

Somewhere on your 8x8 should be the recipe. In my case, I created a pocket for a tag and put a photo of the finished creation on the front. To create a pocket, cut out a desired size piece of cardstock. Score on what will be the bottom at 1/2 inch. Fold. Adhere to your page. Adhere the sides how you please; in my case I used brads but you can use 1/8 red tape if you want.

On the tag, in the back, is a flip card with the recipe.

I used my new Tim Holtz BIGZ dies for the reindeer in flight and the tag.

For the recipe card, well that took some trial and error practice. I did it on my computer, MS Word, and formatted the page to landscape. I used scrap printer paper until I had the formatting correct and then I fed my printer the ivory cardstock.


On the reindeer: I used a cereal box and ran it through my Xyron first, colored side to the sticky. Then I printed up a copy of Christmas music (I play the piano), strunk down a little (about 50%), on the ivory cardstock and placed on the sticky side of the cereal box. Run the whole thing through the die cutter (I have a cuttlebug and big kick). Ink the edges.

The punches were MS and EK.

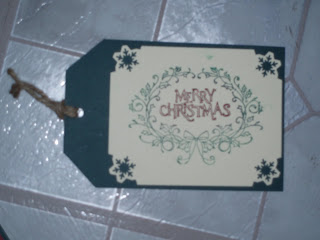
On the tag itself, have a very nice Christmas stamp, don't know the name and my scraproom is a mess right now. I was able to customize my ink job with my Tim Holtz blending tool for the center by dabbing it on the pigment ink pad, and then ink with pigment ink the edges the color of choice.

I hope everyone can see the actual recipe. Enlarge to get the ingredients. These are very tasty! If you don't want the seeds in your tarts then simply use jam.

Enjoy!


Wednesday, March 2, 2011

blog candy #2 - day 7 on layout challenge

First of all, I am having a cricut cartridge give away! The winner will have their choice of one of the following: Once Upon a Princess, Nursery Rhymes, Summer in Paris, Summer Vacation, Independence Day, Pumpkin Carving, October 31st, H20, Thanksgiving, Christmas Village, or Christmas Cards.

To qualify for a chance to win this give away you must do all of the following:
1. follow my blog
2. post a comment below telling me which cart you want and how you would use it in a layout using my layout below as a guide and inspiration.
3. Post something on your own blog linking back to my blog about this give away.
4. US continental addresses only (sorry! no International, APO's, Territories, Hawaii or Alaska)

And that's all there is too it! I will pull a winner from the Random.org drawing and announce the winner Saturday 9 PM CST. Good luck! :-)

Below is the layout. I did it a while ago. If I had to do it again I would definitely do it a little different; such as adhere the sentiments neatly on the side of the photos instead of scattered all over the page.Thank goodness for Un-du...right?

The printed paper used was from BoBunny. I chose it because I was looking for something with a white core. I cut several strips of paper to 3/8 of an inch and curled it like ribbon, placing it under the flowers. On the double dot paper I ran it through a label maker and punched out the various sentiments. Then I lightly sanded the top of the embossed letters so the white core came out.


This layout also involved tearing and distressing as you can see. I also sprayed white paper with Glimmer Mist, crumpled up, unfolded, and dried with a heat tool. Adhere behind the cardstock in the torn out windows. Be sure to distress the edges!

Next, I cut out the images on all photos so they would really pop against my Glimmer Mist background!


Enjoy!:


Again, good luck to all in this give away challenge.

Freda